7.19.2013

In the kitchen: Thyme Roasted Cauliflower + Mushrooms over Red Quinoa + Kale


Despite the nearly-unbearable heat wave we're experiencing here in the Northeast, I woke up jonesing for some roasted cauliflower. (Go figure.) Historically, I'm not one who is able to resist cravings, so I decided to deal with the situation by roasting the veggies in the cooler, early morning hours and then assembling the salad later in the day. It's a cinch to make and packed full of delicious, healthy ingredients - the perfect lunch recipe!


Thyme roasted Cauliflower + Mushrooms over Red Quinoa + Kale Salad
Serves two

3/4 lb. cauliflower, cut into florets or bite-sized pieces
1 cup sliced mushrooms
Approx. 10 sprigs of fresh thyme, leaves removed from half of them
2 tablespoons olive oil, plus a little more for drizzling
1/2 cup red quinoa
3/4 cup water
3-4 kale leaves (I prefer Lacinato kale, both in general and for this recipe.)
1 tablespoon of your favorite salad dressing or vinaigrette
Salt + Pepper
Feta cheese, crumbles (optional)

Pre-heat your oven to 400°.

Place cauliflower florets and mushrooms on a rimmed baking sheet. Drizzle 2 tablespoons of olive oil over the vegetables. Sprinkle with fresh thyme leaves + sprigs and salt + pepper. Gently toss to combine the vegetables with the olive oil and spices.

Bake the vegetables for 30 minutes - stirring half-way through - until the mushrooms are nice and soft and the cauliflower begins to caramelize. Remove from oven and set aside.

Rinse and drain the quinoa. Drizzle a bit of olive oil in the bottom of a small saucepan over medium-low heat, add the quinoa, and toast for a minute or two. Pour 3/4 cup of water in the saucepan. Bring to a boil, then reduce the temperature and let simmer until all the water has been absorbed, 15-20 minutes. Remove from heat, sprinkle a pinch of salt over the quinoa, and fluff it with a fork. Set aside.

Rinse and dry the kale leaves. Place the leaves on top of one another and gently roll together, lengthwise. Slice the kale about 1/4 inch thick. Gently toss the kale "ribbons" with the salad dressing and let sit for about a five minutes. (This will help to soften the kale, as it can be a little stiff.)

After the kale has had a chance to soften up, divide among two bowls. Top with the quinoa and then the roasted vegetables. Add a final, light drizzle of olive oil and a bit of fresh cracked pepper. If you're feeling it, you can top it off with some crumbled feta cheese. (I'm lactose-intolerant, so I skip this part, but my husband loves the addition of a little cheese. Blue cheese would also work here.)

// A few notes... //

I made this for two, but the ingredients can easily be increased for more servings. Just double or triple as needed. 

6.28.2013

In the kitchen: S'mores Brownies


Food is a very sense-memory thing for me. (Sense-memory being an acting technique buzzword in which certain stimuli help to evoke memories or emotions, helping you get into character.) I've never used food as a way to get into character for a role I've played, but it certainly triggers memories and emotions for me in my day to day life. BBQ chips remind me of time spent snuggled up on the couch with my Dad, watching our weekly episodes of Star Trek or any of the brilliant James Bond movies. Warm, currant-filled scones remind me of my  Great Grandmother, Nana - she made the BEST authentic Scottish scones I've ever eaten - made on a hot griddle, not in the oven. The way her Granny did it. A salty, savory dirty martini instantly gives me butterflies and takes me back to that time I fell in love with the Man of my Dreams while sipping on one at a charming theatre bar out on Long Island. These are things that not only remind me something intellectually, but eating or drinking, or even the aroma of them gives me goose bumps or makes me smile.

I'll give you another, easy example: s'mores. What do you think of when you bite into, or even think about a s'more? For me, I think: camping, family, campfire, warmth, deliciousness, chilly nights, smoke, childhood, friends, burnt marshmallows. There's something about a s'more which can instantly transport you back to the last time you sat bundled up in a plastic, fold-up chair situated just close enough to the roaring fire to keep warm, but still far enough away so that you didn't fill your lungs with the burnt, smokiness billowing from it. To me, it is a comforting sense-memory. One that makes me feel warm inside. Relaxed. Content.


We've been back from our honeymoon for almost a month now, and already I'm jonesing for a night spent in the middle of nowhere, underneath the stars. You'd think two weeks would have satiated me for awhile, but apparently not. I am happy to be back in our home with our furry beasties tucked happily in our apartment and the energizing vibrancy of the city outside of it, but re-entry into Real Life can be quite jarring after several weeks away. And it's amazing how quickly I forgot that relaxed, content feeling I had while sitting around the campfire dreaming big dreams with My Love 'neath the stars. 


So although I can't transport my Real Life to the campsite (at least not yet, anyway), I can bring a little bit of the campsite to my Real Life. And that is precisely what I did when I made these…


Ooey, gooey, s'mores heaven. Or: Camping in a brownie. The graham cracker crust makes a nice, crunchy base for the cakey brownie. After a quick, rough chop to some chocolate and another graham cracker, I added that to the top of the brownie before piling high with mini-marshmallows and popping under the broiler for a few minutes. Some folks like a melty marshmallow - I prefer a burnt marshmallow. A bit of smoke and charred sugar to add to the gooey sweetness inside. Different strokes for different folks. Even the smell of these brownies is enough to take you back to The Happy Place, but the taste! So good. Good enough that it inspired me to embrace my current location, put a few brownies on a plate and sit on couch in the living room with My Love - the room lit by candles, not campfire - dreaming big dreams 'neath the noisy footsteps of our upstairs neighbors.

And that will do for now.


S'mores Brownies
Recipe by Alison Walla

For the crust:

6 Tablespoons unsalted butter, melted
110 g. graham cracker crumbs (about 1 cup, or 8 graham crackers)
25 g. granulated sugar (about 1.5 tablespoons)
Pinch of salt

For the brownie:

10 tablespoons unsalted butter (1 1/4 sticks)
270 g. granulated sugar (1 1/4 cups)
85 g. unsweetened cocoa powder, natural or Dutch-process. (3/4 cup plus 2 tablespoons)
1/4 teaspoon salt
1/2 teaspoon pure vanilla extract
2 cold large eggs
112 g. all-purpose flour (about 3/4 cup)


For the topping:

1 Cup semi-sweet chocolate chips
3 cups mini-marshmallows

Crumbs of one graham cracker (about 1/4 cup)

To make:

Pre-heat oven to 325ยบ.

Line the bottom and sides of an 8" cast iron skillet (or an 8" baking dish) with foil and lightly grease the foil. Set aside.

For the crust: In a small bowl, mix the graham cracker crumbs, sugar, and salt until well combined. Add the melted butter and mix with a fork until the crumbs are evenly and well coated. Pour into prepared skillet/dish and flatten out using the back of the fork. Bake for about 20 minutes, until the edges look a little dry and the crust is nice and golden.

For the brownie: Combine the sugar, cocoa powder, salt, and butter in a medium sauce pan. Place over medium heat and mix all the ingredients together, stirring occasionally, until all the butter is melted and the mixture is thick and hot. (Watch it carefully, so that it doesn't burn on the bottom!) Remove from heat and allow it to cool until it is warm, rather than hot.

When the chocolate mixture has cooled a bit, mix in the vanilla and then add the eggs, one at a time. The mixture will be thick and shiny and beautifully chocolatey. Once the eggs are fully incorporated, continue to beat with for about a minute - 40 more strokes or so. Add the flour and mix just until the flour disappears - do not overmix. The batter will be very thick.

Spoon the brownie batter over the graham cracker crust and smooth out the top. Place the skillet back in the oven and bake for another 30-35 minutes - until a toothpick comes out just slightly gooey. (If you like a more fudgy brown, bake a little less.) The top of the brownie will have a nice, dark matte look to it. Remove from the oven. Set the oven to Broil.


For the topping: Sprinkle the chocolate chips over the top of the baked brownie. Dust some of the graham cracker crumbs over the chocolate chips, and top it all off with as many mini-marshmallows as your little heart desires. Sprinkle the remaining crumbs over the marshmallows.


Place the mallow-topped brownies back in the oven, making sure there is 6-8" between the brownies and the broiler. Broil for 1-2 minutes - or if you're like me and you like burnt marshmallow - a solid 2 minutes. Just watch them carefully - never take your eyes off them, really - until they're browned/burnt to your taste.


I suggest letting the brownies cool a bit before you cut into them, just enough to let the marshmallow cool off a bit. It will help with the cutting. Speaking of: When you cut the brownies, I also suggest dipping your knife in a glass of water before each cut. Sounds a little tedious, but this will help keep the marshmallows from sticking to your knife and thus creating a sticky, rather unattractive brownie.


// A few notes... //

When creating this recipe, I tried it several ways, but the version posted above was my favorite. However, the variations beg mentioning...

Should you be more in the mood to Sandra Lee these brownies - feel free to use a boxed brownie mix for the brownies. Voila! Semi-homemade... but really good semi-homemade.

Should you be gluten-intolerant - feel free to use the faux graham crackers (found at Whole Foods) for the crust, but be sure to add a bit more sugar - 2 + tablespoons - and your favorite G-F brownie recipe. Of course, you could always Sandra Lee this, too and used a G-F boxed brownie. Note: I would NOT use the King Arthur Gluten Free brownie mix. Much to my surprise, it was not very good. Dry and very fake tasting. However, after some research, Betty Crocker sells a mean G-F brownie mix. Just, FYI.


6.11.2013

In the kitchen: Date + Pistachio Olive Oil Cookies


 As a wedding gift we were given an amazing cookbook, The Lebanese Kitchen by Salma Hage (Phaidon). My husband is of Lebanese descent and although my Mother-in-law sets the bar very, very high for delicious, authentic Lebanese food, I am eager to try my hand at it. I confess I'm intimidated by the venture, though, so the only thing I've made so far is hummus. (I know, I know - one of the easiest things to make. Ever.) However, I have spent quite a bit of time perusing the book - soaking up the ingredient lists, the gorgeous photography by Toby Glanville, and new-to-me methods of preparation.
This morning I woke up rather early, so I brewed some coffee and sat down with the book, slowly waking up and stretching the muscles of my brain while looking for inspiration among the pages. My comfort zone with cookbooks is in the bread/pastry chapters, so it's no surprise that after 30 minutes of reading about dates, pistachios, rosewater, orange zest, and honey I was itching to get up out of my chair to see what, if any, of those ingredients I had on hand.
As luck would have it, I had a handfull of dates and some pistachios and without having any idea where I was heading with it, I started chopping them up. 


After a good, rough chop, I put the chopped fruit + nuts in my mini-food processor, then added a tablespoon of light brown sugar, some orange zest, and a teaspoon of bourbon and wound up with the most delicious and aromatic mixture! Sweet, nutty, a hint of citrus. Mmmm. So... what was next?
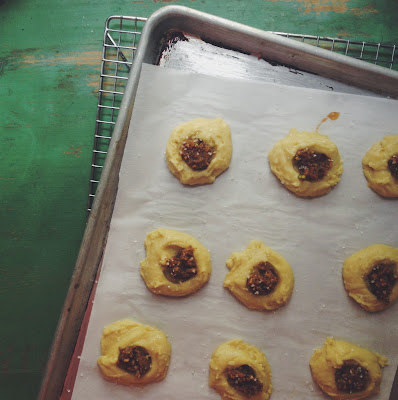
During my morning reading I had come across a recipe for something called ma'moul - a beautiful, decorative mounded Lebanese cookie filled with a mixture of dates or nuts. Not having a ma'moul mold nor the patience to roll out/cut dough, I decided to make a version of a thumbprint cookie, using the pistachio + date filling in place of jam. 


I find dates have a particular sweetness to them, so I usually pair them with something less sweet - even on the savory - side. And any of you who have had my cookies know that I don't make overly      sweet things. I can't stand it when lovely and inventive flavor combinations get drowned out by heaps of sugar - it ruins a Good Thing and gives me a tooth ache. That, in turn, makes me grumpy, and no one should ever be grumpy as a result of eating a cookie. No one.
So I made these thumbprint cookies with an olive oil cookie base. Well, truth be told, I made the first round with a version of my shortbread recipe, but about half-way in to baking them I decided I wanted to try an olive oil version as well. Both were good!


The shortbread cookie base begets a dense, melt-in-your-mouth sort of cookie, while the olive oil version produces a lighter, more cakey version with a bit of a crunch - reminiscent of Haamantaschen. If pressed, I think I prefer the olive oil version (recipe below), but that could just be the mood I'm in today. Historically, I do have quite an affinity for shortbread.
Over both a brushed a very simple orange juice + sugar glaze. It not only gives the cookie a slight sheen, but helps to mesh the cookie base with the fruit + nut paste by enhancing the citrus flavor.


Date + Pistachio Olive Oil Cookies 
Recipe by Alison Walla
 For the fruit + nut filling:
125g dried, pitted dates, chopped (about 14 dates)
50g shelled pistachio nuts (about 1/3 cup) 
1-2 tsp freshly grated orange zest
1 tbsp light brown sugar
1 tsp bourbon (optional) ** You could use water, if you prefer
For the olive oil cookie dough: 
2 cups unbleached, all-purpose flour
1/2 tsp baking powder
Pinch of salt
1/2 cup extra virgin olive oil
3/4 cup sugar
2 eggs
For the orange glaze: 
1-2 tbsp freshly squeezed orange juice
1 tbsp sugar

To make: 
Preheat the oven to 350°. 
Zest the orange and set aside. Then juice the orange and set aside.
Roughly chop the dates + pistachios and place in the bowl of a food processor (I used my mini-food prep). Add the light brown sugar and orange zest. Pulse until fully incorporated and a thick paste forms. Add the bourbon (or water) and process until the mixture smooths out a bit. Set aside. 
Combine the flour, baking powder, and salt in a bowl.
In another bowl, add the sugar to the olive oil and beat until light, 2-3 minutes. Add the eggs and continue to beat until creamy and fluffy, a few more minutes. Gradually add the dry ingredients to the bowl until well combined and smooth. You should have a thick + shiny cookie dough consistency.  Place the bowl with the dough into the fridge for about 10 minutes, or as long as it takes you to put away ingredients and clean up your work space. 
Using two teaspoons or a small cookie scoop, drop mounds of the cookie dough onto a cookie sheet lined with parchment paper, an inch or two apart. Dab a little bit of olive oil onto the back of one of the spoons, and gently make a little well in the center of the cookie. Fill the well with a bit of the date + pistachio mixture (roughly 1/4 tsp each). Sprinkle with coarse sugar and bake for 15-18 minutes, until the tops and sides of the cookies are lightly golden and the bottoms easily lift up off the parchment. Transfer to a cooking rack and let cool for a few minutes. 
In a small bowl, combine the orange juice and tbsp of sugar, whisking to dissolve the sugar. Once the cookies have cooled slightly, brush the top and sides of each cookie with the juice/sugar mixture. Serve warm or let cool completely and store in an air-tight container for up to a week.

3.19.2013

In the kitchen: Mini German Pancakes


I don't do breakfast. Let me clarify: I don't make breakfast. Sure, I can bake a quiche or muffins or scones or even bagels if I'm in the mood, but generally speaking breakfast is a meal that I rarely, if ever, attempt. I know they say that breakfast is the most important meal of the day, but honestly, all I want for the first few hours after I wake up is a strong cup of coffee and a cozy chair to nestle in as I slowly greet the day. I do enjoy a good poached egg or a stack of fluffy banana pancakes on occasion, I just don't like having to actually make anything so early in the day. So I guess that makes me more of a brunch person. A brunch-at-a-restaurant person.

I used to joke with my girlfriends about how I hoped I'd marry a man who does breakfast, because if he ever hoped to have it or if our future kids ever hoped to have it, someone would have to step up... because Mommy will be very busy nestling and drinking coffee. As it turns out, I did find such a man. 

Michael wouldn't call himself a cook but he does have a few culinary tricks up his sleeve: He is a Top Ramen expert. He can make a mean (and spicy!) chili. He is a self-proclaimed Mac 'n Cheese connoisseur (... he even has a method for attaining the perfect consistency on the cheese sauce). And he loves to make his mom's recipe for German Pancakes. 

Bingo! Pancakes = breakfast.


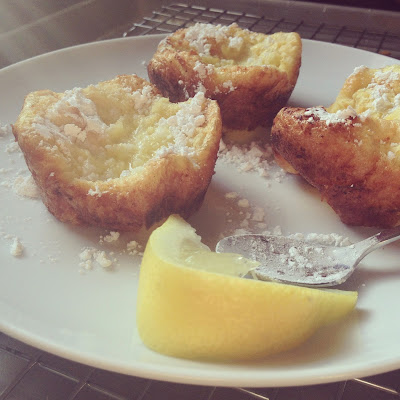
It's always an exciting day when Michael decides to make me his special pancakes. They're light and fluffy - with the flavor and texture of a popover. With the mini version, you've got the perfect breakfast bite, making them excellent for brunch or for a bridal or baby shower.


My preferred touch of sweetness to these eggy breakfast bites is some homemade chocolate cherry preserves. If I can ever find the time - and my hastily jotted down notes - I'll be sure to share the recipe with you. But let's move on the good stuff, shall we?


Michael's Pancakes, or Mini German Pancakes

Makes: Either 2 large pancakes or 24 mini pancakes

Ingredients:

2/3 cup flour
2/3 cup milk
4 eggs
2 Tablespoons unsalted butter, melted and cooled slightly
Dash of nutmeg if y'ant. 

Additional 2-4 tbsp. unsalted butter (2 tbsp if using 2 pans, 4 tbsp if making mini pancakes)

Toppings:

Powdered sugar
Lemon
Jam or preserves of your choosing

Directions:

Preheat the oven to 400 degrees.

Lightly beat the eggs in a medium bowl until the yolks and whites are incorporated. Add the remaining ingredients and beat well. (Note: I prefer to use a KitchenAid with the whisk attachment because I think it makes the pancakes a bit fluffier, but if you don't have one you can use a good old fashioned whisk and you'll be just fine. After all, pancakes have been around longer than electric mixers.)

Using additional butter, cut into little pieces and divide among 24 cups on a couple of muffin tins, or two 9" pans (Alternatively, pie plates work well.). Place the tray/pans in the oven to melt the butter.

When butter is bubbling hot, swirl it around to coat the bottom and sides of each cup or the two pans. 

Divide the batter among the cups/pans and bake for 10 minutes, until they've puffed up well. Turn the oven to 350 to finish baking the pancakes until they've turned a light, golden brown. (You may not need additional time, so just keep an eye on them.)

Let the pancakes cool for a minute or so. They will deflate once out of the oven. If making the mini-pancakes, you may need to run a knife around the edges, and jimmy them out with a large spoon. (If using a non-stick muffin tin, then you may not need to - I have old muffin tins, so I have to scrape the bottom of the pancakes a bit with a spoon.) Top with freshly squeezed lemon juice and a generous dusting of powdered sugar, and if you're feeling up for it - a dollop of preserves.

2.22.2013

Team B+L: Carolyn, our resident "Lupine Lady"


Today, we've got a lovely guest post from one of our team members, Carolyn Walsh. Carolyn was the first person to be brought on board to help me out in kitchen. Michael had been my trusty assistant from the very beginning stages of the company, but for the sake of our relationship I fired him. (Smile) I think it turned out to be a good decision, though, as we were married last month. Thank Goodness for Carolyn - baker, candy maker, and relationship equalizer.

When I first asked her to write a post for the blog, she balked at the idea - "What on EARTH am I going to write about!?" - but I encouraged her that this was a low-pressure gig; just a fun way for people to get to know the folks that are a part of our Team. I told her to write about whatever she wanted; about what inspired her, her favorite cookie, her family, what she's learned since joining B+L, her love of books - whatever! It was the mention of her love of books that got to her, because her countenance lightened and I could practically see the wheels spinning in her head! I'd managed to pique her interest.

A few weeks later, she emailed me with her post, and I must say - I was immediately drawn in to her story. I was also impressed. Not only can she perfectly bake a zillion trays of cookies, but she can write, too! So, without further adieu, I encourage you to carve out a few minutes in your afternoon, brew a fresh cup of coffee, and get to know Carolyn and the Lupine Lady...

********************

My mother read to me quite a lot when I was a little girl.  We started (as I imagine is normal) with picture books , but quickly moved on to bigger and better things (I used to believe this was due to my astonishing intellect; upon later reflection I've decided it was more probably a result of Mom's low tolerance for picture books).  Many of the nicest things about myself--including my close relationship with my mother and my excellent vocabulary--I credit to the time we spent reading grown-up books that went completely over my head, but there was one picture book that never dropped completely off our map.


Miss Rumphius (story and pictures by Barbara Cooney) just might be the greatest book ever written.  It is the story of the elderly Lupine Lady, once a little girl named Alice who dreams of traveling to faraway places and growing old beside the sea.  Her grandfather, an artist, encourages these dreams, but tells her that there is a third thing she must do--something to make the world a more beautiful place.  Alice agrees, though she does not know what that might be.  


I'm tempted to quote the entire book to you line by line, but I wouldn't want to give away and lovely surprises.  Suffice to say that the illustrations are gorgeous, the text is poetic without being precious and in the end, Alice grows up and meets the challenge set by her grandfather.


Although I--like little Alice--am a little overwhelmed by the challenge of "doing something to make the world a more beautiful place," I try not to forget that little beauties can be just as important as big ones.  My neighbor may be gardening for his own personal pleasure, but his two-foot-square oasis of a garden brightens our entire block (and unlike the gigantic amazing Brooklyn Botanic Gardens, is free to all passersby!).

So while keeping in mind that I would someday like to have a Lupine-Lady-level impact on the world, I am working on little things for now.  I like to think that when I pick up a piece of trash on the sidewalk I'm at least doing my part to hold ugliness at bay; as I approach the globally-insignificant task of painting my apartment, I think about how life in a more comforting environment will allow me better access to my creativity--maybe once I've freed my mind from how dingy the walls are, I'll be able to focus on something else.  Something like baking the perfect pumpkin oatmeal cookies or, you know, solving world hunger.  One thing at a time.

2.15.2013

In the kitchen: Banana Bread


I've found myself with a little bit of downtime in the kitchen. The crazy rush of holidays orders are over, and things have quieted down a little bit - just enough to allow me to experiment with new cookies, new flavors, new ideas... as well as revisit old recipes - ones that I've been making for years - ones that remind me why I love baking so much.

I was headed to the kitchen early one morning, and before I grabbed my cup of coffee to rush out the door, I noticed some bananas sitting on the counter that had gone un-eaten due to the busyness of my life outside of baking. I took one look at that sad, fragrant, little heap of bruised fruit and thought, "Well... of course! It must be done. They're calling to me, and I must heed the call."


... so I did. I dusted off an old recipe - one lovingly ripped off from my Best Friend - and got to work exercising my baker-muscles. Not the entrepreneurial baker-muscles I use on a daily basis, but the original ones - the ones motivated by the specific recipe, the specific story behind the recipe, and the specific recipient of the end result. The orginal baker-muscles that eventually led me to create Butter + Love.


I have to tell you, few things are more comforting to me than the smell of freshly baked banana bread. It reminds me of Thanksgiving morning: My Best Friend Stephen and I spend Thanksgiving together every year - have been for eight or so years now - and my absolute favorite part of the day is waking up, brewing a fresh pot of coffee, and then sitting on the couch with him - drinking coffee, eating warm banana bread, and watching the Macy's Day Parade, laughing at the sometimes ridiculous banter of the news anchors. It's a morning I look forward to every year.

So, sure... it's not Thanksgiving and I didn't make these solely for Stephen and myself, but I do hope the recipients of these mini baked beauties get the same comfort and satisfaction out of them that Stephen and I do. It's bread that warms the heart - which is the best kind of bread.


Thanksgiving Day Banana Bread
(lovingly ripped off and slightly altered from my Best Friend, Stephen's recipe)


For the bread:

3/4 cup butter (softened)
1 1/2 cups sugar
3 large eggs, separated
5 large very ripe bananas, mashed
3 cups flour
1 1/2 tsp. baking soda
3/4 tsp. salt
1/2 cup sour cream
1/2 cup milk
3/4 cups finely chopped pecans

For the topping:

Equal parts dark brown sugar and chopped pecans, and a dash of cinnamon and freshly grated nutmeg

Grease and flour 2 loaf pans (or use mini disposable pans, as shown above).
Cream butter and sugar together thoroughly. 
Add eggs yolks one at a time, beating well after each addition. 
Add bananas, mixing well. 
Measure 1/2 cup milk and add sour cream to fill the cup.
Sift together the flour, soda and salt. 
Add the flour and milk alternately to the banana mixture, ending with the flour.  Add the nuts and mix well.
Beat egg whites until they stand in stiff peaks; fold carefully into banana batter.
Divide batter evenly between the pans. 
Sprinkle tops with brown sugar/pecan mixture.
Bake at 325 degrees for 1 hour.

Note: These freeze well if you wrap them in Saran Wrap and then Foil.